
3D model made from stacked layers
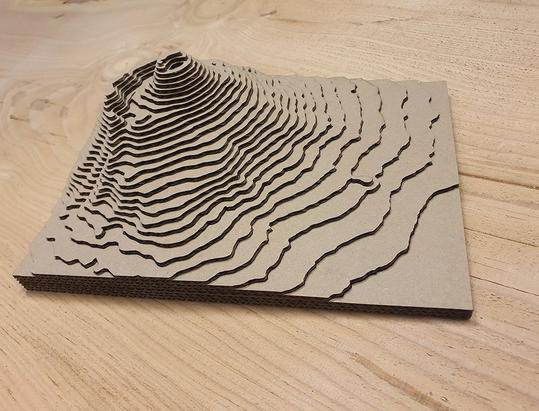
A common application of laser cutting is creating relief models or scale models. This can be of areas, buildings, terrains, and much more. In this tutorial, we show you how to create your own terrain model by generating a digital 3D model and converting it into a layered model. Of course, this technique can be applied to virtually any 3D model.
Requirements:
-Adobe Illustrator
-Fusion 360 software incl SlicerforFusion360 extension
-Bison wood glue (or Bison hard plastic glue if the material choice is plastic)
Generate terrain model

The first step is to generate a 3D model in Map2STL. For this tutorial, we have created a model of Mount Vesuvius in Italy. However, it is also possible to create your own design for purposes such as model making or architectural models.
For a good result, we recommend choosing a not too large region due to the height differences. The larger the region, the less precise the model is.
You can drag the rectangle on the map to select an area, and you can enlarge this rectangle by moving the "box-size" slider.The sample rate is normally 2, but if you want higher quality, you can drag it to 1. For large areas, it's better to choose a higher sample rate due to the file format.
The options "model scale" and "Vertical Scale Factor" should remain unchanged. The "base height" is the thickness of the base plate, and the "water drop" is the height difference between water and land. Both can be changed as desired, but this is not necessary. Once you are satisfied with the area, the model can be generated and downloaded.
3D to 2D

To prepare the model for laser cutting, the 3D mesh needs to be converted into stacked layers. We use the SlicerforFusion360 extension for this. The extension is free, but Fusion360 is necessary to use the extension, and it is not free for everyone.
Import the model into SlicerforFusion360 and scale the object to the desired dimensions, our model is 200x100mm. Next, specify the properties of the material to be processed, which can be done via the pencil icon in the top left corner.
Create a new material using the "+", and specify the length, width, and thickness of the sheet material. The horizontal and vertical margins are both 5mm, tool diameter and slot offset are not applicable, so both can be set to 0. Now that the material settings are correct, the model can be converted. Go back to the main window and select "stacked slices" under the construction techniques.
Depending on how the model is imported, the orientation of the stacked layers may need to be changed. This can be done by clicking on "slice direction" and rotating the relevant axis in the correct direction.
To avoid unwanted shapes in the result, it is important to remove them. Click on the circle next to "dowels" to make them visible, then manually remove the generated dowels by clicking on the top of the newly appeared dotted lines that run vertically through the model and pressing delete. Once all of these are removed, the model should be completely blue.
In the right window, the generated layers are displayed, which can be exported using the "get plans" button at the bottom left. Export the layers as .EPS to a desired file location.
Final touch in i(llustrator)
The final step is to prepare the .EPS files for laser cutting. Extract the files in the location where the export is saved.It may occur that there are multiple files depending on the number of layers. Open the files individually in Adobe Illustrator.

If the drawing is positioned sideways on the artboard, select everything and rotate the drawing 90 degrees. Then remove the "border" around the drawing. If there are very small parts in the drawing (<5mm), it is recommended to remove them.
The drawing consists of both cutting lines and engraving lines, but both have the wrong color. Select the entire drawing and ungroup the selection once. Then select all the red lines, which can be easily done by selecting one red line and then selecting > Same > Stroke Color. Change all the red lines to a desired color (not blue and not red), we will come back to this shortly. Now select all the blue lines and change them to red.Select all lines that were originally red (which now have a desired color) and change them to blue. Now the engraving lines have been changed to cutting lines and vice versa.
The numbers on the different parts correspond to the order in which the model should be assembled, and the other engraving lines are to align layers correctly during assembly. We recommend finding the last parts (parts with the highest number and probably the smallest size) and removing the number from them, otherwise, it will be visible in the final result. Do the same for auxiliary engraving lines that are under small parts that were previously removed. Select all lines now and set the line thickness to the smallest possible value. Save the file(s).
Laser cutting and assembly
You can have the parts cut immediately by uploading your drawing in our online laser cutting tool. After receiving the parts, you can stack all the layers to ensure there are no errors in the design.
Now the gluing can begin, start with the first layer (base plate) and glue the second plate on it, and so on. Make sure not to glue too close to the edge and press each part firmly onto the other. Also, be careful that the lower layers do not shift when you press the layers together.
Once all the layers are glued, you are done! Depending on the material, you can optionally treat the model with a varnish to ensure it lasts longer, but this is not necessary.